Monday, February 24, 2014

Remodeling the basement - The aftermath of the flood. Part 1

Of course C and I had to return to Pitt.  We had to go back to work so we couldn't devote time to redoing the basement right away.  That, and with the wedding in November, as much as we wanted, this was just not a "now" thing we could handle.

What we did start doing was brainstorming.  How could we make the basement waterproof.  And we came up with this fantastic idea... tile!  Tile floors and tile walls up to a chair rail.  Tile is waterproof, just think of your shower.  We can make the basement just like a big shower.  We didn't like the idea to put tile all the way up the wall because its pricey, and its not very easy to hang stuff on tile.  At least not as easy as drywall.
We also planned to elevate the electronics, dvd's, books, basically anything that we want to hang on the walls will be higher than 1 ft off the ground.  Sofas, coffee tables, all that can just be thrown out if it gets wet.  We were tired of sorting through our possessions and having to choose, keep or toss.

In the months since the flood, I even built an elevated Rubbermaid rack.  Notice the bottom shelf is elevated.  See, originally I thought I was smart.  Cardboard is porous, but Rubbermaid containers are not.  So if we ever did get water, all our "stuff" would be safe!  WRONG.  When you get 11 inches of water Rubbermaid containers get buoyant and float and then turn to a side.  Then water gets in the containers because the top is not waterproof.  I knew the top wasn't waterproof, but I didn't think about the fact that the container would get buoyant and then flip on its side.  Live and learn...


Anyway, we thought our plan - tile - was golden.  Until we talked to a contractor.  It was too expensive.  Like WAY too expensive. Like we could add a gigantic addition onto our house for the price of the tile in the basement.  Our contractor said we might as well build a pool into our basement.

He said, get the insurance (which we have) and do drywall.  Yes it sucks, if you get water, but its cheap and easy to replace.  So, unfortunately, we are currently installing drywall, framing and carpet.  Maybe our second house will have overhead sewers....

Monday, February 17, 2014

Misery Loves company - Home ownership part 4

Well, last we left off C and I had just emptied the basement.

Once the basement was empty, C cleaned the basement first with Lysol and then after it all dried (a few days later) he used bleach.  It was the only thing we could do in order to try to get rid of some of the smell.

It was still pretty cold in the house because the circuit board was fried on the furnace.  It took a few days to get the new board in stock.  But, it wasn't too bad.  The next few days were warmer and sunny.

My mom came over one day and helped us clean the things we were going to keep.  Although I have to say this whole experience taught me that the chemicals you can buy at the store are worthless.  Seriously, read the fine print.  Bleach may kill 99.9% of bacteria, but there is always a little asterix next to the statement.  It doesn't kill ALL bacteria, only a certain strain.  And NOTHING you can find at Walgreens or jewel can kill mold.  I guess that's why the pro's cost so much money...

The quote the pros gave us over the phone was 2,000-2,500 for the square footage of the basement.  When they got to the house they estimated it being closer to 3 or 4k.  But that's OK, I had a feeling the original price was low.  We showed them the basement, and asked if they could keep the wood paneling.  They said no.  It had to go.  So they basically just took a circular saw and cut the entire basement wood paneling off.  Thus making our "partially finished basement, no longer anywhere close to being finished.

I think one of the scariest parts was after the techs took off all the wood paneling they already found mold growing.  It was nothing serious, only a patch of mold about 3 inches in diameter.  They were able to get rid of it with special antimicrobial spray stuff.  I was shocked.  It had been less than a week.  But I guess that's what happens when you get water.  The told us not to worry, concrete is porous and would absorb the spray solution stuff.  As long as the basement dried properly, we wouldn't have to worry.

It took over a week for the basement to dry.  Unfortunately, that also increased the cost.  It ended up costing $6,000 to properly clean and dry the basement.

Of course none of that includes any of the amount of damage to the walls any of the furniture or other possessions we lost.

And... insurance didn't cover any of it.  Insurance doesn't cover "acts of God." Although I should call it an "act of stupidity."  Apparently some moron didn't open the deep tunnel in Chicago and that was the main cause of the problem.  Anyway, I called the insurance company and said there was water in the basement, we don't know how it got in.  It could have been coming in through the window wells, or up through the sinks, or the sump pump, we have no idea.  They said they don't cover water coming in through the window wells, and we don't have flood insurance which would cover it coming up through the sinks.  And we don't have sump pump failure insurance which would cover if the sump pump failed.

Let me just say, Lesson Learned.  Now we have sump pump failure insurance (a few hundred a year), flood insurance ($1,000 ish a year), and major appliance failure insurance ($20 a year).  Major appliance failure insurance is if your water heater or washer burst and flooded your entire basement.  Basically, I never want to deal with this ever again.  It was hell.

Just an FYI - Insurance only covers permanent possessions.  Walls, carpet, washer/dryer, furnace.  So that real expensive surround system you have in your basement?  You'll get nothing for that.  Not even $10.

It is now almost a year later (10ish months) and we are JUST starting to redo the basement.  More on that later.

The damage -


Monday, February 10, 2014

Bridesmaid Hangers - Pinterest Inspired


Some of you know I got married last November. Which is part of the reason why I slacked on the blog. Sorry about that! Anyway, I've finally got the time to update the blog on everything I've wanted to share over the past year. :)


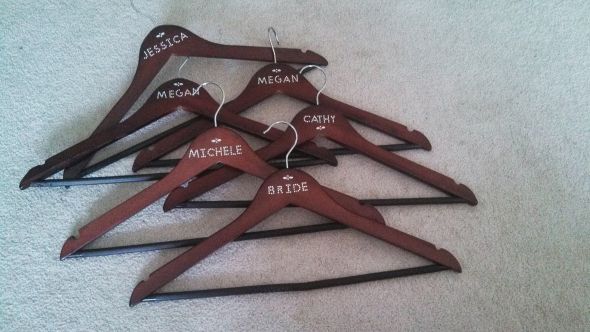
Bridesmaid hangers!

 Wire Name Hangers :  wedding bridesmaids diy hangers with names in wire silver wire hangers wire name writing wooden hanger Wire Hangers 3


I absolutely love the bridesmaid hanger shot. You know, with all the bridesmaid dresses and all on matching hangers. So I started to research how to make those really cute hangers. I didn't want to spend $20 on a hanger for 1 picture (which is the cost to buy it via etsy) especially since I had other ideas for gifts for my bridesmaids. So, DIY it was. :)


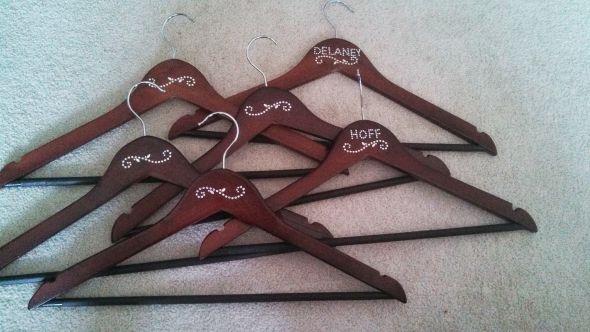
I also made them for my mother and my fiance's mother. I got the hangers at Bed Bath and Beyond. Then I went to Michaels and got the blinged stickers. I really wanted to do glitter, but my MOH hates glitter and calls it "The H*rpes of Craft." Haha. She says glitter always gets EVERYWHERE! And since my Bridesmaids and my dress have zero glitter on them, I didn't want them to have any glitter specks on their dress.
Bridesmaid Hangers :  wedding IMG 20130609 154157 858

Bridesmaid Hangers :  wedding IMG 20130609 154240 920

One of my bridesmaids is married, so I put her last name on the hanger, And I put my new last name on the hanger as well. :) I don't know what the bridesmaids thought of them, but I think they liked them. I can't wait to see the photos from the professional photographer!

All in all, I love the way they turned out.

Friday, February 7, 2014

DIY Wedding Invitations

Man o Man.  The wedding invitations were probably one of the biggest decisions of the wedding.  I started looking for invites early, and either I didn't like them, or they were obnoxiously over budget.  So I mixed and matched.

I was a bit picky with the invitation itself.  Seriously, I think I had 100 + samples sent to me over a few months because I couldn't figure out what I wanted. I wanted the raised lettering for the invite so that it was a bit fancier, so I didn't want to print the invitations myself.  I found some beautiful Vellum invitations at Michaels. My theme was vines/shamrocks and these were leaves and trees.  But they were close enough and I love the way they turned out.

I'm also a huge fan of the pocket invites.  So I ordered the pockets through cards and pockets and created the inserts myself.
DIY Purple and Green Wedding invites. Pic Heavy :  wedding celtic clover diy green invitations invite irish purple rsvp shamrock  DSC2878


Honestly, the inserts were difficult. Not the RSVP.  That was pretty straight forward, although I was not 100% sure what to put on the RSVP.  In hindsight, it would have been better to ask who wanted the Chicken, and who wanted the pork.  Instead of a circle for them to fill in, a line probably would have been better.  Oh well, just a lesson learned.


DIY Purple and Green Wedding invites. Pic Heavy :  wedding celtic clover diy green invitations invite irish purple rsvp shamrock  DSC2881

But trying to figure out what to put on the inserts.  Very challenging.

Misc on the Left, Directions on the Right.
DIY Purple and Green Wedding invites. Pic Heavy :  wedding celtic clover diy green invitations invite irish purple rsvp shamrock  DSC2882

Although the most challenging thing was creating the map.  I took a screenshot on google maps, and then placed it in paint.  Then I just drew the lines and then deleted the background.  It took a LOT longer than I expected.

DIY Purple and Green Wedding invites. Pic Heavy :  wedding celtic clover diy green invitations invite irish purple rsvp shamrock  DSC2883

I also ordered the damask monogram band through cards and pockets.  These I could have printed at home, but by this time I was tired of printing everything, the RSVP, misc and directions were difficult

Another big decision was the envelope color.  I knew I wanted calligraphy on the invitation envelopes and I knew I wanted the RSVP envelopes to be the same color as the invitation envelope.  My colors were Dark Purple and Dark Green. If I had envelopes in dark green, how would I address them?  I would have to use white labels, and I thought that would look tacky.  So the two choices were lighter green and white.  And I didn't want white.  So light green it was.

I ended up getting some inspiration for the labels. I put a little shamrock on the labels for the RSVP's and for the return addresses on the invitations.  I thought it looked very cute. :) The addresses for the invitations were done in calligraphy by my husband. He is a man of many talents.
DIY Purple and Green Wedding invites. Pic Heavy :  wedding celtic clover diy green invitations invite irish purple rsvp shamrock  DSC2879

I couldn't believe how long everything took to make.  I would recommend budgeting about 3 weeks for 100 invitations.  Especially if you are DIYing everything.
DIY Purple and Green Wedding invites. Pic Heavy :  wedding celtic clover diy green invitations invite irish purple rsvp shamrock  DSC2888

I don't think I would change anything, except the trees... I would have loved to find a vellum invite that had shamrocks or something on it.  Just small details only I would notice. I still love the way they turned out. :)

Wednesday, February 5, 2014

Thanks to my Neighbors

Chicago has gotten 55+ inches of snow this year.  More snow this year than the past 2 years combined.  All I have to say is, Mother Nature... I'm done with winter. I'm done with the cold and the snow.  Where the heck is Spring??

But the purpose of this post is not to complain, its actually to Thank my Neighbors.

C has been gone for a few weeks now working in Ohio.  I've been stuck shoveling the driveway because our snow blower is out of commission, and frankly fixing it is not on the top of my list.  (I'm hoping have it fixed by next weekend though) I think this is the only time in my life that I'll be grateful that I only have a single car driveway.  But I'm lucky because there have only been a few times when I had to shovel the sidewalks.

See there is this one neighbor, who owns a 4-wheeler and a plow.  Every time it snows he plows all the sidewalks in the entire neighborhood.  Honestly, its wonderful.  If I could find out who the neighbor was, I would go and give him a bottle of scotch.  But I have no idea who he is!  I have only seen him once of all the times he has plowed our sidewalk.  I think he does it while I'm at work or something, no idea.  The one time I saw him it was at the beginning of the snow season (this year) and he was on his 4-wheeler happy as a clam on a Saturday.  I wasn't prepared to stop him to ask where he lived.  I just waved and screamed Thanks, and he waved back.  So, to the neighbor out there, if I see you, I owe you a bottle of scotch.  Seriously, Thank you for plowing my sidewalk this year.  You've saved my back!

But I'm still stuck shoveling the driveway.  Which really isn't that bad.  Except for the fact that we have a single car driveway and the snow is piling up.  Before today the snow piles were so big and so wide that they were encroaching on the driveway and I could barely get my car in the driveway without driving over the banks.

So, I woke up this morning and shoveled the 6 inches of snow we got and left for work.  On the drive home I prepared myself mentally for attempting to shovel the rest of the snow that fell and attempt to widen my driveway entrance.  Mind you, the snow bank was basically as tall as I am so it was going to be difficult.  So I came home, parked on the street and went inside to change into my boots.  I went outside to find my wonderful neighbor in the process of plowing the apron that I was just about to dig into.  He was even making it wider for me just like I was going to!  How amazingly nice is that!  Had I not walked outside to shovel I'm pretty sure my neighbor would have started on the rest of my driveway.  Honestly, it was the nicest surprise in the world.

I plan to buy ingredients for cookies, or brownies or muffins or something this weekend and deliver them as a Thanks.

But To both men and their families... Thank you very much.  I appreciate it!

Monday, February 3, 2014

Do Not Disturb - Pinterest Inspired

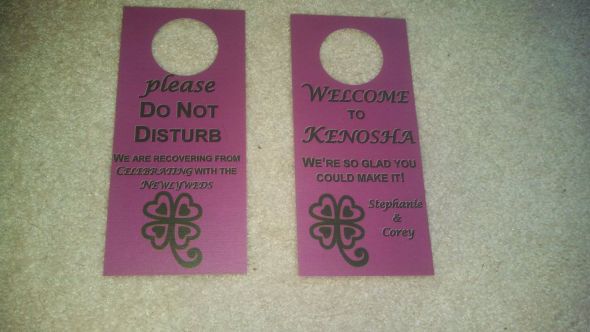
I saw these on Pinterest, and I absolutely loved them.

do not disturb wedding door hanger template - Google Search In welcoming bags, cute!

So off I went to Vistaprint. I designed the layout myself and sent it to Vistaprint to print it there.  I had a groupon so I printed everything on high quality paper cheaper than if I was going to print it myself.  I used the "note card" on Linen Finish.  I had a minor heart attack when the door hangers arrived from Vistaprint because they didn't print correctly.  One side was printed upside-down.  But a quick call to Vistaprint remedied the problem and they sent new ones right away.

 Then I went to Michaels and bought a 3 inch circular punch by Fiskars.  It was a long process, because the paper was thicker than the punch was meant to be used with, but I love the way they turned out. :)

We put them in the hotel welcome bags.  I can't remember if everyone used it, but I know I saw a few on the doors when my new husband and I were walking back to the rooms.

Do Not Disturb With a Shamrock Flair :  wedding green purple 991947 10100333165575514 349432384 O

Saturday, February 1, 2014

Misery Loves company - Home ownership part 3

Well, we left off here - http://dizzyingthoughts.blogspot.com/2013/10/misery-loves-company-home-ownership_11.html

We came home and saw the damage.  The house was freezing, and basically it was gloomy.

We woke up the next morning "ready" to start digging through everything, but we weren't ready emotionally.

I had made several phone calls to flood cleaner people.  They couldn't come for at least 3 days, possibly more.  So off we went to taking as much crap as possible out to the garbage.  Most of the things were easy-ish to take to the trash.  Chairs, sofas, papers, all had to be taken out to the trash.  But there were certain things we had to think about.  What about a sleeping bag?  That can be washed... but do you really want to sleep in a poop bag?  Nope... so off it went to the garbage.

There were other issues with certain things that were not electronic or fabric that didn't need to be thrown out.  Those were just placed in a "to clean" pile.

Then there was the issue of actually taking the sofa outside... first of all, the sofa was 100% waterlogged.  It was heavy as all could be, and it was just C and I emptying the basement.  So, off we go, to the top of the stairs to get the sofa out of the basement.  It was the most difficult thing I think I have ever done, and it was exasperated by the fact that it wouldn't fit through the door.  Since we moved in we changed the door to the side yard and neither of us realized that the door was slightly smaller.  By an inch or so.  And unfortunately that inch meant the leather waterlogged sofa wouldn't fit through the door.  So after I had spent a TON of energy pushing the couch up the stairs, and C had spent a TON of energy PULLING the couch up the stairs he told me. "It doesn't fit."  Honestly, I wanted to cry.  How can this stupid heavy as h*ll couch NOT fit through the door!!

It was the worst words to hear.  So we take the couch back the basement and C starts waking it with a crowbar and saw and hammer and whatnot taking it apart.  I mean at this point, its not like it needs to stay in one piece.  I think C got a lot of aggression out this way. He dismantled 2 full size sofas, 1 loveseat, and 2 chairs.

We had to throw out a lot of emotional things...
Up until this day I had every single ribbon I had ever won while horseback riding.  I had every 1st, every last, and everything in between.  But when they are covered in poop water, its not something I want to keep anymore.... I threw out the first ribbon I ever won with my first horse.  Several first place ribbons.  Several national titled ribbons...

My horses halter was saturated.  The last halter he wore when we had to put him down.  That was rough.


C's uncle was in the military and back in the day his cousin and uncle would send him letters, snail mail.  Before this flood he kept every single letter they sent him.  Those all had to be thrown out.  You couldn't even read them anymore.  He also had a few external hard drives that had photos on them.  Those were waterlogged and had to be thrown out as well.

Those were the hardest things to throw out.  The memories.  I mean the furniture sucks... we had perfectly usable mini-fridges, enough couches and chairs to sit everyone comfortably, but the memories.... Sucks... To this day, almost a year later, it still brings me to tears.

Anyway, these are the photos.  I only managed to take photos of the 1st garbage trip.  We had just as much garbage the 2nd day of cleaning.