Showing posts with label DIY. Show all posts

Thursday, May 22, 2014

Building Corner Bench Seating


So - my brother decided he likes woodworking.  He also decided to take some time off from work before he starts medical school.  The last thing he decided is he doesn't like to do nothing, so I was able to give him several projects.  Including building me corner bench seating in the kitchen. :)

I'm so excited.  I can't wait for it to be done.  We will get more storage and it will complete the kitchen.  Right now the kitchen looks strange, IMO.  I don't have any photos of the strange area (probably because the kitchen is always a huge mess) but just trust me.  There are 2 windows in the corner and we could not continue the cabinets because the bottom of the window was 2 inches too low.

So, my solution is a window seat.  These are photos of the inspiration for my window seat -
window seat made out of stock kitchen cabinets
Kitchen window seatMimi Storage Bench Revised | Do It Yourself Home Projects from Ana White
Inspiration for my kitchen window seat
Built In Window Seat - AMAZING inspiration for my kitchen Banquette on a budget: Repurpose inexpensive storage cubes or a cheapie bookshelf to make a cozy dining bench.
Unfinished cabinets from Lowes = bench seating & storage!


The problem was... none of these came with simple plans.  So I modified this one with very detailed, amazing  PLANS
Farmhouse Media Console | Do It Yourself Home Projects from Ana White
So that the door was on the top.

I can't wait to post the finished product!

Monday, March 3, 2014

DIY Raised Garden Bed

It has been my dream to have my own garden.  And literally a weekend or so after we closed on the house, back in 2012, I built this raised garden bed.  

I used the instructions here - http://www.sunset.com/garden/backyard-projects/ultimate-raised-bed-how-to-00400000011938/

After reading the comments in the above link I read that the wood would sometimes bow outward due to the weight of the soil.  So I added the separator in the middle and so far it works great.  It has been 2 years and there haven't been any problems.  

Building the raised garden bed was a piece of cake.  One of the challenging (and expensive) things was filling the bed with dirt.  I can't remember the specifics, but I think I bought $100 worth of top soil.  I didn't even buy the fancy plant stuff, just regular black dirt and it barely filled the bed 1/2 way.  Each year I just figured I would buy a few more bags of dirt, or through in some peat moss or compost or something.  Last year I bought 2 bags of dirt and 1 bag of peat moss, and I'm sure I'll do the same thing this year.  

The bird netting is kind of a pain in the behind when it comes to mowing the lawn.  I need to figure out a better solution for it.  The netting always gets caught in the mower blades, or I don't pay close enough attention and the plants grow through the netting.  This year I think I may just keep the netting on the garden while the plants are seeds or when they are first planted, and then chance the birds.  We'll see.
I can tell you I've definitely got my money's worth of vegetables from the garden. :) Just ask my mother and friends.  I constantly drop off extras with them so they don't go bad. 

I'm so tired of winter that I'm already starting to plan springs garden. 

Friday, February 7, 2014

DIY Wedding Invitations

Man o Man.  The wedding invitations were probably one of the biggest decisions of the wedding.  I started looking for invites early, and either I didn't like them, or they were obnoxiously over budget.  So I mixed and matched.

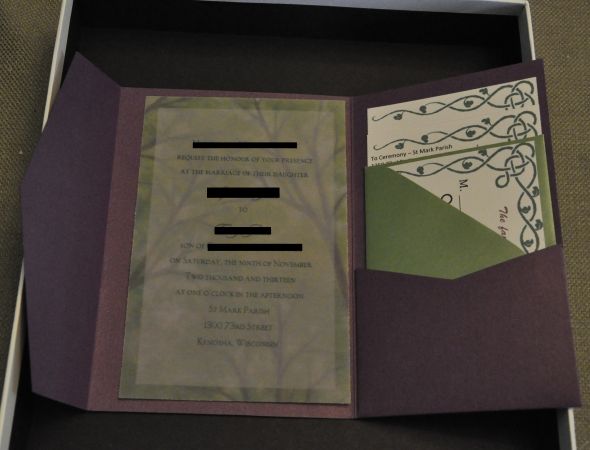
I was a bit picky with the invitation itself.  Seriously, I think I had 100 + samples sent to me over a few months because I couldn't figure out what I wanted. I wanted the raised lettering for the invite so that it was a bit fancier, so I didn't want to print the invitations myself.  I found some beautiful Vellum invitations at Michaels. My theme was vines/shamrocks and these were leaves and trees.  But they were close enough and I love the way they turned out.

I'm also a huge fan of the pocket invites.  So I ordered the pockets through cards and pockets and created the inserts myself.
DIY Purple and Green Wedding invites. Pic Heavy :  wedding celtic clover diy green invitations invite irish purple rsvp shamrock  DSC2878


Honestly, the inserts were difficult. Not the RSVP.  That was pretty straight forward, although I was not 100% sure what to put on the RSVP.  In hindsight, it would have been better to ask who wanted the Chicken, and who wanted the pork.  Instead of a circle for them to fill in, a line probably would have been better.  Oh well, just a lesson learned.


DIY Purple and Green Wedding invites. Pic Heavy :  wedding celtic clover diy green invitations invite irish purple rsvp shamrock  DSC2881

But trying to figure out what to put on the inserts.  Very challenging.

Misc on the Left, Directions on the Right.
DIY Purple and Green Wedding invites. Pic Heavy :  wedding celtic clover diy green invitations invite irish purple rsvp shamrock  DSC2882

Although the most challenging thing was creating the map.  I took a screenshot on google maps, and then placed it in paint.  Then I just drew the lines and then deleted the background.  It took a LOT longer than I expected.

DIY Purple and Green Wedding invites. Pic Heavy :  wedding celtic clover diy green invitations invite irish purple rsvp shamrock  DSC2883

I also ordered the damask monogram band through cards and pockets.  These I could have printed at home, but by this time I was tired of printing everything, the RSVP, misc and directions were difficult

Another big decision was the envelope color.  I knew I wanted calligraphy on the invitation envelopes and I knew I wanted the RSVP envelopes to be the same color as the invitation envelope.  My colors were Dark Purple and Dark Green. If I had envelopes in dark green, how would I address them?  I would have to use white labels, and I thought that would look tacky.  So the two choices were lighter green and white.  And I didn't want white.  So light green it was.

I ended up getting some inspiration for the labels. I put a little shamrock on the labels for the RSVP's and for the return addresses on the invitations.  I thought it looked very cute. :) The addresses for the invitations were done in calligraphy by my husband. He is a man of many talents.
DIY Purple and Green Wedding invites. Pic Heavy :  wedding celtic clover diy green invitations invite irish purple rsvp shamrock  DSC2879

I couldn't believe how long everything took to make.  I would recommend budgeting about 3 weeks for 100 invitations.  Especially if you are DIYing everything.
DIY Purple and Green Wedding invites. Pic Heavy :  wedding celtic clover diy green invitations invite irish purple rsvp shamrock  DSC2888

I don't think I would change anything, except the trees... I would have loved to find a vellum invite that had shamrocks or something on it.  Just small details only I would notice. I still love the way they turned out. :)